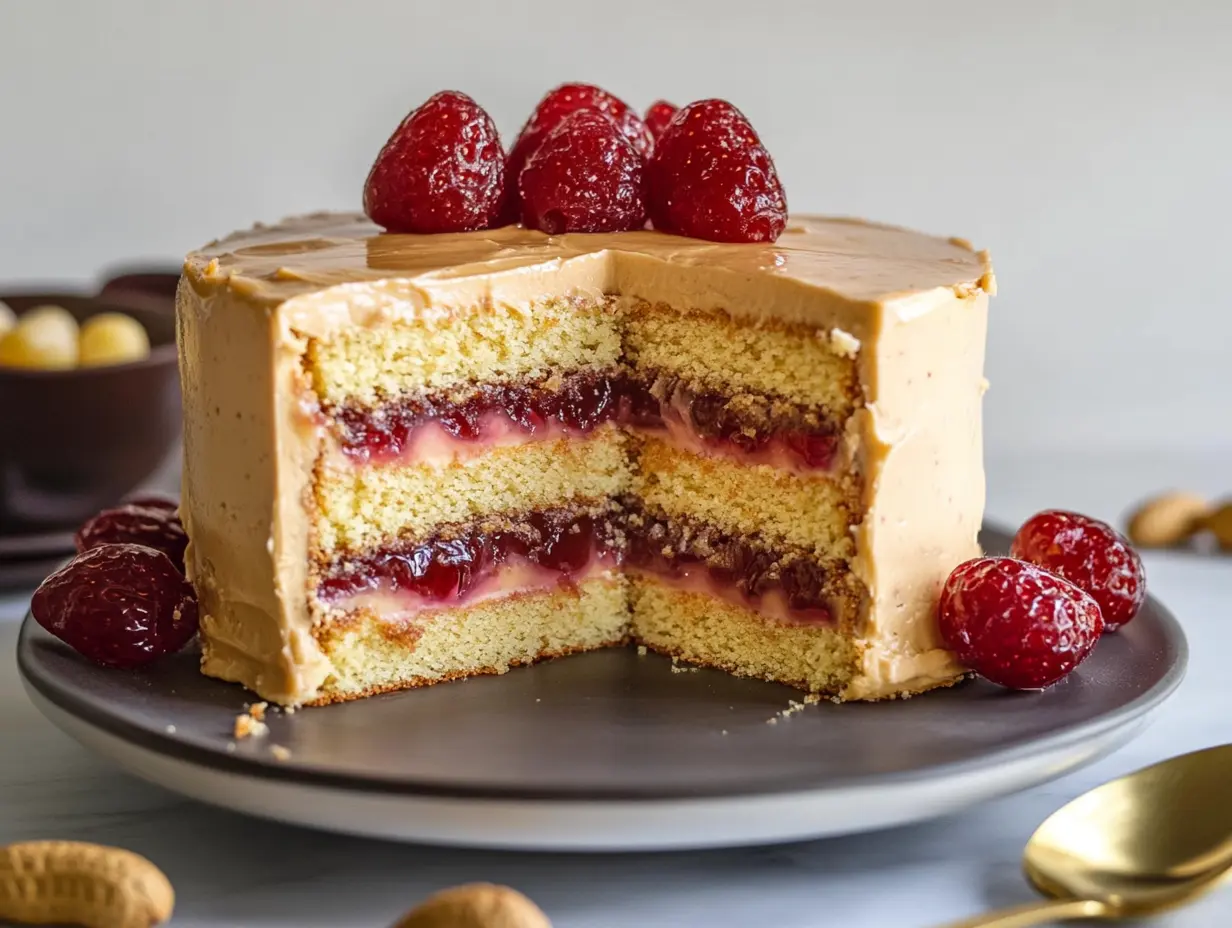
When it comes to classic flavor pairings, few rival the timeless combination of peanut butter and jelly. Whether spread between two slices of bread or baked into a delightful treat, this duo never fails to spark childhood memories. But what if you could take those nostalgic flavors to the next level? Enter the peanut butter and jelly cake—a moist, flavorful dessert that’s both comforting and indulgent.
Why You’ll Love This Cake
The peanut butter and jelly cake is more than just a dessert; it’s a delightful fusion of nostalgia and indulgence. Imagine the creamy richness of peanut butter paired perfectly with the sweet and slightly tart notes of fruit jam, all layered in a moist, tender cake. Each bite evokes memories of classic childhood snacks, but with a grown-up twist that appeals to both kids and adults alike.
Whether you’re planning a family gathering, a themed party, or just craving something unique, this cake fits the bill. It offers a balance of flavors and textures, from the dense cake layers to the smooth, whipped frosting, to the juicy burst of jam. Plus, this cake is versatile. You can customize it with your favorite jam—strawberry, grape, or even blackberry—to suit your taste. It’s an easy yet impressive dessert that stands out on any dessert table and is bound to get people talking (and coming back for seconds!).
Key Ingredients for a Peanut Butter and Jelly Cake
Creating the perfect peanut butter and jelly cake starts with choosing high-quality ingredients that enhance its flavor and texture. Here’s what you’ll need:
- For the Cake Layers:
- Cake flour: Provides a soft and light crumb that’s essential for a delicate cake texture.
- Baking powder: Ensures the cake rises evenly without becoming too dense.
- Unsalted butter: Adds richness while allowing the flavors of peanut butter and jam to shine.
- Peanut butter: Opt for creamy for a smooth consistency or chunky if you want some crunch in the cake.
- Granulated sugar and brown sugar: The blend of sugars creates a balanced sweetness and adds moisture.
- Eggs: Help bind the ingredients and contribute to the cake’s structure.
- Vanilla extract: Enhances the overall flavor profile.
- Buttermilk: Adds a slight tang and keeps the cake tender. If you don’t have buttermilk on hand, check out these baking tips for easy substitutions.
- For the Filling:
- Strawberry jam: A classic choice, but you can switch it up with raspberry, grape, or even homemade jam for a personal touch. The quality of the jam you choose significantly impacts the overall taste.
- For the Frosting:
- Peanut butter: The star of the show! A high-quality creamy peanut butter is best for achieving that smooth, velvety finish in your buttercream.
- Unsalted butter: Balances the richness and helps create a stable frosting.
- Powdered sugar: Sweetens the frosting while keeping it light and fluffy.
- Heavy cream: Adds creaminess and ensures the frosting is easy to spread.
- Vanilla extract: Complements the peanut butter’s nuttiness, enhancing the overall flavor.
Choosing the right peanut butter is essential, especially for the frosting. Learn more about selecting the best peanut butter brands to elevate your cake.
Step-by-Step Cake Preparation
Creating the perfect peanut butter and jelly cake requires careful attention to each step to ensure the flavors and textures come together harmoniously. Here’s a more detailed breakdown:
- Mix the Dry Ingredients: In a medium bowl, sift together the cake flour, baking powder, and salt. Sifting ensures a light, airy texture and helps the ingredients distribute evenly. Set aside this mixture, as you’ll be gradually incorporating it into the wet ingredients.
- Blend the Wet Ingredients: In a separate large mixing bowl, cream the butter and peanut butter until they’re smooth and well combined. This step is crucial as it sets the foundation for a rich, flavorful cake. Gradually add the sugars, beating until the mixture is light and fluffy. Next, beat in the eggs one at a time, ensuring each egg is fully incorporated before adding the next. Finish with the vanilla extract, which will bring out the warm, comforting flavors.
- Combine the Mixtures and Bake: Now, it’s time to alternate adding the dry ingredients and the buttermilk. Start and end with the dry ingredients, mixing just until combined after each addition to avoid overmixing. Overmixing can lead to a dense, tough cake rather than the tender crumb you’re aiming for. Once the batter is smooth, divide it evenly between your prepared cake pans.
- Baking Tips: Preheat your oven to 350°F (175°C) and bake the layers for 25-30 minutes, or until a toothpick inserted into the center comes out clean. Let the cakes cool in the pans for 10 minutes before transferring them to a wire rack to cool completely. For more tips on achieving perfectly even layers, refer to these cake baking tips.
The preparation might seem straightforward, but attention to detail, like proper creaming of ingredients and mindful mixing, makes all the difference in achieving the ideal texture and flavor for your peanut butter and jelly cake.
Making the Peanut Butter Frosting
The frosting is the star that brings this peanut butter and jelly cake together. Achieving the perfect peanut butter buttercream requires a delicate balance of ingredients and techniques. Here’s a more detailed guide on how to make it:
Start by beating together room-temperature unsalted butter and creamy peanut butter until they’re fully blended and smooth. The key is to whip the mixture until it’s light and fluffy, which usually takes about 3-5 minutes on medium-high speed. Properly whipping at this stage ensures the frosting has an airy, cloud-like texture, making it easier to spread and pipe.
Next, gradually add powdered sugar, one cup at a time, while continuing to mix on low speed. Adding the sugar slowly prevents the frosting from becoming overly sweet and helps it maintain a silky texture. Once the powdered sugar is incorporated, you’ll add heavy cream and vanilla extract. These ingredients not only enhance the flavor but also make the frosting creamier and more spreadable. If the frosting feels too thick, you can add more cream, one tablespoon at a time, until you reach your desired consistency.
For extra fluffiness, beat the frosting on high speed for an additional 2-3 minutes. The result should be a rich, velvety buttercream with a balanced peanut butter flavor that isn’t too overpowering. You can taste as you go and adjust the sweetness or creaminess to your preference.
Assembling the Cake
Once your cake layers and frosting are ready, it’s time for the fun part—assembling the cake! Proper assembly ensures that the cake not only looks impressive but also holds its shape when sliced. Here’s a detailed guide to getting it right:
- Level the Cake Layers: Before stacking, make sure each cake layer is flat by leveling off any domed tops using a serrated knife. This creates a stable base for stacking and helps the cake look more professional.
- Apply a Frosting Dam: On the first layer, pipe a border of frosting around the edge. This “frosting dam” prevents the jam from seeping out when you add the filling. The dam acts as a barrier that holds everything in place, ensuring a clean look and even layers.
- Spread the Jam Filling: Inside the frosting dam, spread an even layer of your chosen jam. You can use strawberry, raspberry, or grape jam, depending on your preference. If you’re making homemade jam, ensure it’s thick enough so it doesn’t make the cake soggy.
- Stack the Layers: Gently place the next cake layer on top and repeat the frosting and filling process. As you stack, press down slightly to help the layers adhere but be careful not to apply too much pressure, which could cause the filling to spill out.
- Crumb Coat and Chill: After stacking, apply a thin layer of frosting all over the cake, known as the crumb coat. This traps any loose crumbs and provides a smooth base for the final layer of frosting. Chill the cake for 20-30 minutes to set the crumb coat before applying the final frosting layer.
Proper assembly techniques not only make the cake more visually appealing but also prevent common issues like sliding layers or uneven frosting.
Decorating and Presentation Ideas
Once your cake is assembled, the real creativity begins. Decorating a peanut butter and jelly cake can be as simple or elaborate as you like, depending on the occasion. Here are some ideas to elevate your cake’s presentation:
- Smooth and Classic Finish: For a timeless look, spread the frosting evenly with an offset spatula, smoothing out any ridges or air bubbles. You can leave the top plain or add a delicate swirl for a bit of texture.
- Jam Drip Design: Take a small amount of extra jam and gently heat it until it’s slightly runny. Drizzle it over the edges of the cake to create a drip effect. This not only adds visual interest but also reinforces the cake’s peanut butter and jelly theme.
- Peanut Toppings: For added texture, sprinkle chopped peanuts around the top or sides of the cake. This provides a crunchy contrast to the creamy frosting and highlights the cake’s peanut butter flavor.
- Piping Details: If you’re comfortable with piping, use a star or round piping tip to create borders or decorative swirls around the edges. You can alternate between frosting and jam for a two-toned effect.
- Occasion-Specific Decorations: For birthdays, add colorful sprinkles or themed toppers. For more sophisticated events, consider fresh fruit, like strawberries or raspberries, to complement the jam filling.
Decorating your cake is an opportunity to showcase your style and creativity while enhancing the flavors within.

Storing and Freezing Tips
Storing your peanut butter and jelly cake properly ensures it stays fresh and delicious, whether you’re serving it the same day or preparing it in advance. Here’s how to keep your cake in top condition:
- Short-Term Storage: If you’re serving the cake within 1-2 days, cover it loosely with plastic wrap or store it in a cake container at room temperature. This helps maintain the cake’s moisture while keeping it fresh. If your environment is particularly warm or humid, it’s better to store the cake in the refrigerator to prevent the frosting from becoming too soft.
- Refrigeration: For longer storage, the cake can be refrigerated for up to 5 days. Before refrigerating, place the cake in an airtight container or wrap it tightly in plastic wrap to prevent it from drying out. When ready to serve, let the cake sit at room temperature for about 30 minutes to soften the frosting for easier slicing.
- Freezing the Cake Layers: If you’re planning ahead, you can freeze the unfrosted cake layers for up to 3 months. Wrap each layer individually in plastic wrap, then in aluminum foil for added protection. Thaw the layers overnight in the fridge before assembling.
- Freezing the Assembled Cake: You can also freeze the fully frosted cake. Place it in the freezer for 1-2 hours to firm up the frosting, then wrap it securely in plastic wrap and aluminum foil. When ready to serve, thaw the cake in the fridge overnight, then let it come to room temperature before enjoying.
Proper storage not only preserves the cake’s flavor and texture but also ensures you have a ready-made dessert whenever the craving strikes!
FAQs
1. Can I use crunchy peanut butter instead of creamy?
Yes! If you prefer more texture, feel free to use crunchy peanut butter instead of creamy. The small peanut pieces add a delightful crunch that contrasts well with the soft cake layers. Keep in mind that crunchy peanut butter may make the frosting slightly less smooth, but if you enjoy a bit of extra texture, it’s a great alternative.
2. What’s the best type of jam to use for this cake?
The beauty of a peanut butter and jelly cake is its versatility. You can use your favorite jam, whether it’s strawberry, grape, raspberry, or something more unique like blackberry or apricot. The key is to choose a high-quality jam that is thick and not too runny, as a thinner jam could cause the layers to slide and the cake to become soggy. For a more robust homemade flavor, you can also try making your own jam, which adds a special touch to the cake.
3. How can I prevent the cake layers from sliding?
One common issue when assembling layer cakes is that the layers might shift or slide, especially with fillings like jam. To prevent this, make sure you apply a frosting “dam” around the edges of each layer before adding the jam. This barrier helps contain the jam and keeps the layers stable. Additionally, chilling the cake between assembly steps allows the frosting to firm up, which helps hold everything together when you’re adding more layers or slicing the cake.
4. Can I make this cake ahead of time?
Yes, this cake can be made in advance, which makes it a convenient dessert for special occasions. The unfrosted cake layers can be baked up to three days ahead and stored tightly wrapped at room temperature or in the fridge. The frosting can also be made a day or two in advance and stored in the refrigerator; just bring it to room temperature and re-whip it before using. For the best results, assemble the cake the day before you plan to serve it, allowing the flavors to meld while ensuring the cake remains fresh.
5. How do I adjust this recipe for dietary restrictions?
If you need to make this cake suitable for dietary needs, there are a few substitutions you can try. For a gluten-free version, use a gluten-free cake flour blend. For a dairy-free version, substitute the butter with a plant-based alternative and use a dairy-free milk (like almond milk) in place of buttermilk. Make sure the peanut butter and jam are also free from any allergens or additives that might not align with your dietary preferences. You can find more detailed tips on adapting cake recipes for specific diets.
Conclusion
This peanut butter and jelly cake offers a delicious fusion of nostalgic flavors and modern dessert sophistication. Whether you’re a fan of the classic PB&J sandwich or just love experimenting with bold flavor combinations, this cake delivers in every way. Its layers of moist, tender cake, rich peanut butter frosting, and fruity jam make it a truly satisfying treat.
If you’re a chocolate lover, you might also enjoy exploring other delightful recipes like this ultimate chocolate cake with peanut butter frosting or a decadent Reese’s-inspired cake that blends the indulgence of peanut butter and chocolate for a show-stopping dessert.
This cake is a versatile option for family gatherings, celebrations, or even as a fun weekend baking project. Whether you stick with the traditional flavors or put your own spin on it, this recipe is sure to impress and satisfy those cravings for something both comforting and creative!



Leave a Reply