
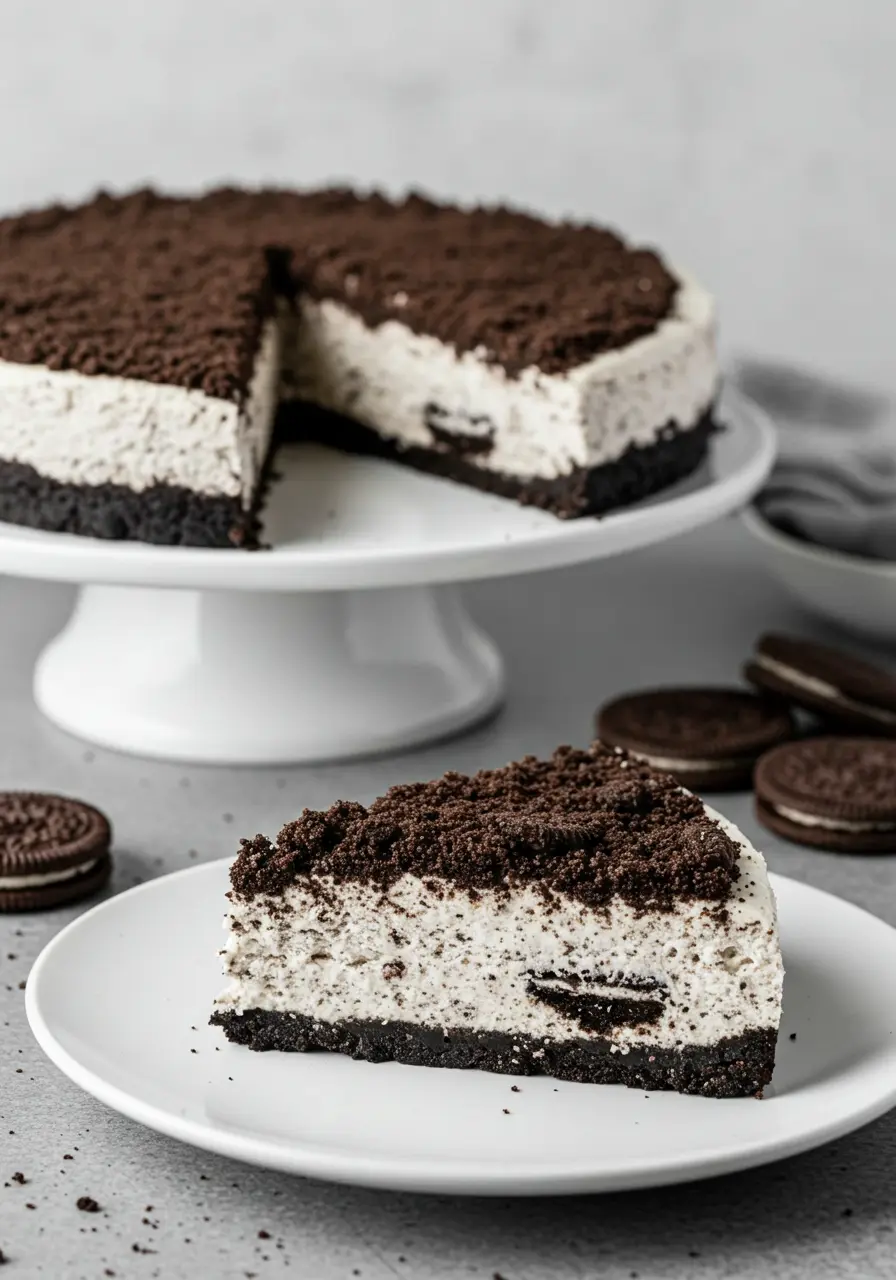
This incredible Oreo Ice Cream Cake makes for the perfect no-bake dessert during warm summer months. The best part? It only requires 4 simple ingredients to create a dessert that will wow your family and friends!
If you’re searching for more refreshing treats, you may also love our No-Bake Reese’s Cheesecake and Lotus Biscoff Trifle.
The Ultimate Summer Treat
As the temperatures start climbing and summer approaches, having a repertoire of cool, refreshing desserts becomes essential. This Oreo Ice Cream Cake has quickly become our family’s go-to dessert for those hot summer days when turning on the oven is the last thing anyone wants to do.
What makes this Oreo Ice Cream Cake so special is its perfect balance of textures and flavors. The buttery Oreo crust provides a delicious foundation, while the creamy Oreo ice cream filling delivers that irresistible cookies and cream flavor we all love. Topped with more crushed Oreos, every bite is a heavenly combination of crunch and creaminess.
This dessert is particularly popular at summer gatherings, birthday celebrations, or anytime you need a simple yet impressive treat. It’s versatile enough to be dressed up for special occasions or kept casual for family movie nights.
Why You’ll Love This Recipe
- Only 4 Ingredients: Simplicity at its finest with minimal ingredients needed.
- No Baking Required: Perfect for hot summer days when you don’t want to heat up the kitchen.
- Make-Ahead Friendly: Prepare this dessert a day or two in advance for stress-free entertaining.
- Customizable: Though the original is amazing, you can easily switch up the ice cream flavor for variety.
- Crowd-Pleaser: Both kids and adults absolutely love this dessert.
How to Make Oreo Ice Cream Cake
Many people assume ice cream cakes are complicated to make, but this recipe proves otherwise! While it does require freezing time between layers (about 6 hours total), the actual hands-on preparation is surprisingly simple.
This cake features three delicious components:
- Buttery Oreo Crust
- Creamy Oreo Ice Cream Filling
- Crunchy Oreo Topping
CRUST PREPARATION
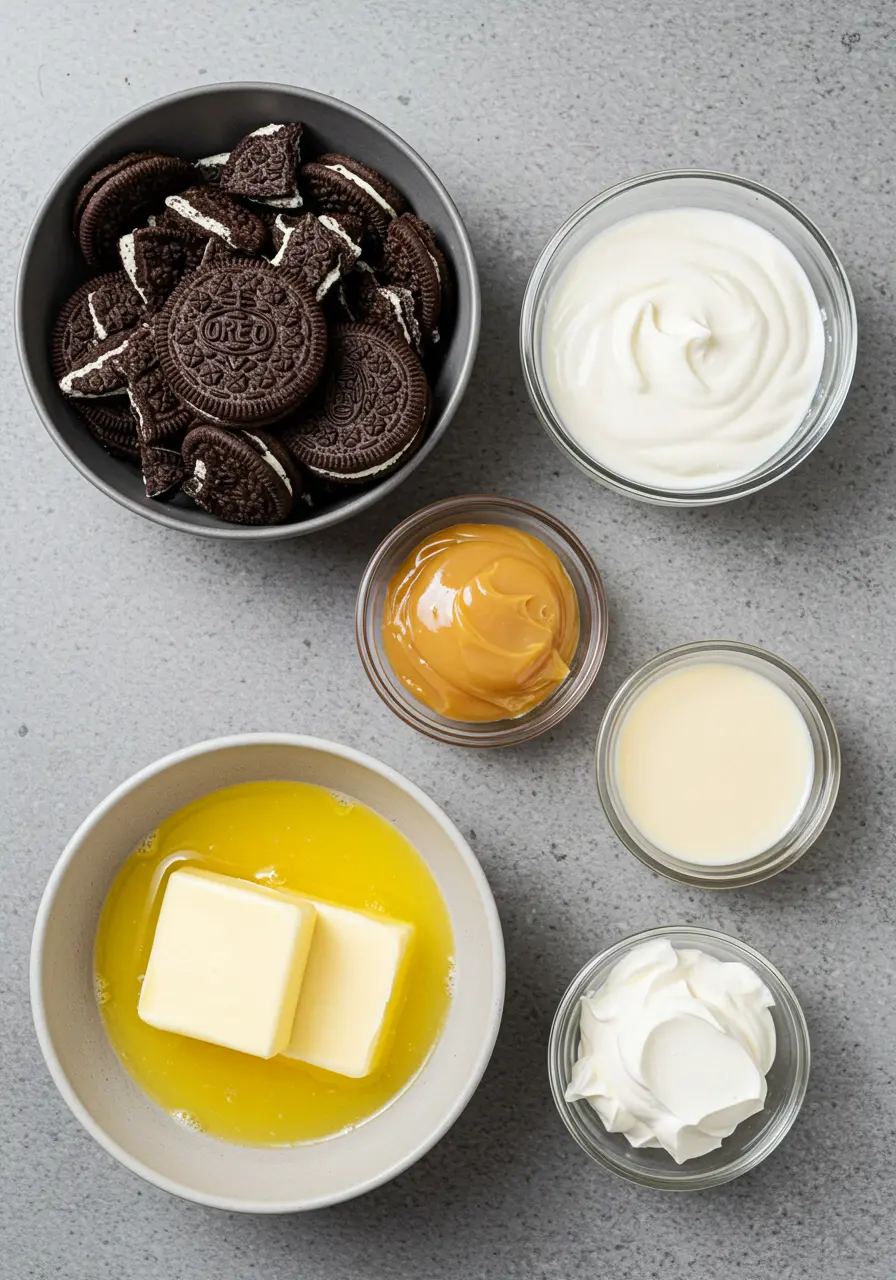
Begin by crushing 36 Oreos until they form fine crumbs. You can use a food processor for speed, or place them in a sealed bag and crush with a rolling pin for a more therapeutic approach! Reserve about one-third of the crushed Oreos for the topping.
Mix the remaining crushed Oreos with 100g of melted salted butter until well combined. Press this mixture firmly into the bottom of a lined 8-inch springform pan to create an even base.
ICE CREAM FILLING
In a large mixing bowl, combine 400ml of cold double cream with one tin (397g) of condensed milk. Whisk until the mixture thickens substantially and holds its shape well – this will create a deliciously creamy homemade ice cream base.
Gently fold in 150g of Oreos broken into chunks. This adds wonderful texture and those signature cookies and cream bursts of flavor throughout the filling.
Pour this mixture over your prepared Oreo crust and smooth the top with a spatula for an even layer.
TOPPING & FREEZING
Sprinkle the reserved crushed Oreo and butter mixture over the top of the ice cream layer. Gently press it down to ensure it adheres to the filling.
Cover the pan carefully and place in the freezer for at least 6 hours, though overnight freezing works wonderfully if you have the time.
SERVING TIPS
When ready to serve, remove from the freezer and wrap a warm towel around the sides of the springform pan for about 30 seconds. This helps release the cake from the sides for a clean removal.
Use a hot knife (dipped in hot water and wiped dry) to slice through the cake for clean, picture-perfect portions.
Variations and Customizations
While the classic Oreo Ice Cream Cake is divine as is, don’t be afraid to experiment with these creative variations:
Layered Round Cake: Instead of using a single springform pan, divide the mixture between two smaller round pans lined with plastic wrap. Once frozen, stack them with additional filling between layers for an impressive presentation.
Mint Chocolate: Substitute the filling with mint chocolate chip ice cream for a refreshing twist that pairs beautifully with the Oreo crust.
Peanut Butter Lover’s: Add a layer of peanut butter between the crust and ice cream filling, or mix peanut butter chips into the ice cream layer.
Celebration Cake: Decorate with colorful sprinkles, chocolate curls, or even candles for birthdays and special occasions.
Coffee Infused: Add 1 tablespoon of instant espresso powder to the cream mixture for a sophisticated mocha flavor.
Pro Tips for Perfect Results
- Properly Softened Ice Cream: If using store-bought ice cream instead of making your own filling, allow it to soften just enough to be spreadable (about 15 minutes at room temperature) but not melted.
- Clean Cutting: Always use a hot knife to slice your cake. Dip the knife in hot water, wipe it dry, then slice. Repeat this process between each cut for professional-looking slices.
- Easy Removal: Line your springform pan with parchment paper or plastic wrap extended over the sides to create handles that make lifting the entire cake out much easier.
- Optimal Texture: Allow the cake to sit at room temperature for about 10-15 minutes before serving to achieve the perfect consistency that’s not too hard to cut but still maintains its shape.
- Crushed Oreos: For the best texture contrast, crush some Oreos finely for the crust, while leaving others in larger chunks for the filling.
Storage and Make-Ahead Tips
This Oreo Ice Cream Cake is the perfect make-ahead dessert! Here’s how to store it properly:
FREEZE: The assembled cake can be stored in the freezer for up to 7 days while maintaining optimal flavor and texture. For best results, wrap it well in plastic wrap and then aluminum foil after the initial freeze to prevent freezer burn.
TRANSPORT: To transport your ice cream cake without melting, place it in an insulated cooler with ice packs. For longer journeys, consider using dry ice (with proper handling precautions).
SERVING FROM FROZEN: Remember to allow about 15 minutes of thawing time at room temperature before serving to achieve the perfect consistency.
More Oreo-Inspired Treats You’ll Love
Recipe FAQs
Can I use low-fat ingredients in this recipe? While you can use low-fat options, the texture and richness may be affected. The full-fat ingredients create the best consistency and flavor.
How far in advance can I make this cake? You can make this cake up to 7 days in advance if properly stored in the freezer.
Can I use other cookies instead of Oreos? Absolutely! This recipe works well with other sandwich cookies. Try chocolate chip cookies, ginger snaps, or even peanut butter cookies.
What if I don’t have a springform pan? You can use a regular cake pan lined with plastic wrap or parchment paper with extra hanging over the sides to help lift the cake out once frozen.
Why is my ice cream cake too hard to cut? Your cake may need more time to thaw. Allow it to sit at room temperature for 15-20 minutes before cutting.
Print
Oreo Ice Cream Cake Recipe
Description
This incredible Oreo Ice Cream Cake features a buttery Oreo crust, creamy Oreo ice cream filling, and crunchy Oreo topping. With just 4 ingredients, it’s the perfect no-bake summer dessert!
Ingredients
For the base & topping:
- 36 Oreos
- 100g salted butter, melted
For the filling:
- 1 tin (397g) condensed milk
- 400ml double cream, cold
- 150g Oreos, broken into pieces
Instructions
- Prepare the pan: Line an 8-inch springform pan with parchment paper.
- Make the crust: Crush 36 Oreos using a food processor or place in a sealed bag and crush with a rolling pin. Reserve approximately one-third of the crushed Oreos for the topping. Mix the remaining crushed Oreos with the melted butter until well combined. Press firmly into the bottom of the prepared pan to create an even base.
- Prepare the filling: In a large mixing bowl, combine the cold double cream and condensed milk. Whisk until the mixture thickens substantially and holds its shape well. Gently fold in the 150g of Oreos broken into pieces.
- Assemble: Pour the filling mixture over the prepared crust and smooth the top with a spatula. Sprinkle the reserved crushed Oreo and butter mixture over the top, pressing down gently.
- Freeze: Cover the pan carefully and freeze for at least 6 hours, preferably overnight.
- Serve: When ready to serve, remove from the freezer and wrap a warm towel around the sides of the springform pan for about 30 seconds to help release the cake. Remove the sides of the pan, slice with a hot knife, and enjoy!
Notes
- For best results, allow the cake to sit at room temperature for 10-15 minutes before serving.
- Store leftover cake well-wrapped in the freezer for up to 7 days.
- To create clean slices, warm your knife in hot water and wipe dry between each cut.
Prep Time: 20 minutes
Freeze Time: 6 hours
Total Time: 6 hours 20 minutes
Servings: 12