
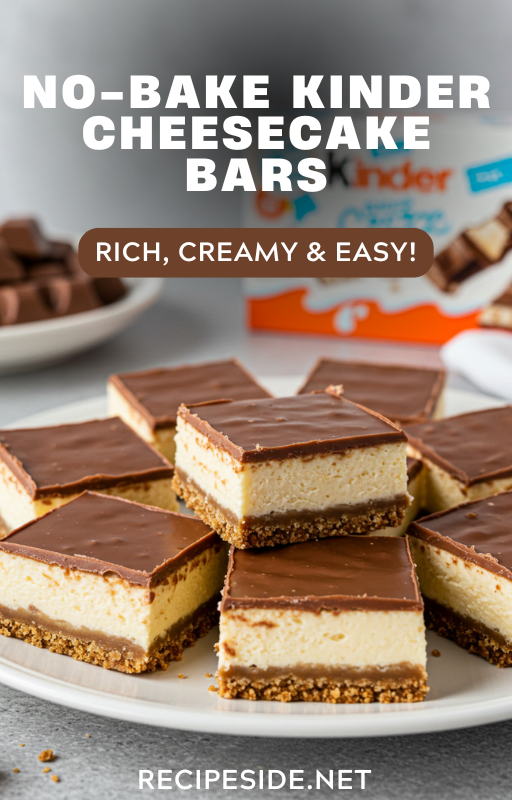
These irresistible No-Bake Kinder Cheesecake Bars combine the nostalgic flavor of Kinder chocolate with a silky-smooth cheesecake texture—all without turning on your oven! With just 6 core ingredients and simple preparation techniques, you’ll create a showstopping dessert that looks professionally crafted while being remarkably straightforward to make.
Why You’ll Adore These Kinder Cheesecake Bars
If you’ve ever found yourself reaching for Kinder chocolate at the checkout line, these cheesecake bars will become your new obsession. The beauty of this recipe lies in its simplicity—no complicated techniques, no temperamental baking times, just straightforward mixing and chilling.
The marriage of creamy cheesecake with the distinctive milk-and-white chocolate fusion that makes Kinder so beloved creates something truly magical. Each layer builds upon the last to create a perfect harmony of flavors and textures.
What Makes This Recipe Stand Out?
The magic of these bars happens in three distinct layers. First, a buttery digestive biscuit foundation provides the perfect crunchy contrast. Next comes the star of the show—a velvety Kinder-infused cheesecake filling that’s both rich and light simultaneously. The crowning glory is a luscious Kinder ganache that sets to a perfect glossy finish, with optional Kinder Bueno pieces adding delightful textural contrast.
While the components sound fancy, the execution is refreshingly straightforward. This makes it an ideal recipe for beginners and experienced bakers alike.
Maximum Flavor, Minimal Effort
What’s particularly impressive about these bars is how the simple preparation belies their sophisticated flavor profile. The layers work in harmony to create something that tastes like it took hours of careful attention, when in reality, your refrigerator does most of the heavy lifting.
The distinctive hazelnut notes in the Kinder chocolate come through beautifully, making these bars instantly recognizable to anyone familiar with this beloved chocolate. Each slice delivers a perfect balance of creaminess, sweetness, and that signature Kinder flavor that’s impossible to resist.
Essential Equipment
Before diving into creation mode, gather these kitchen tools:
- 8×8-inch (20×20cm) square baking tin
- Parchment paper or non-stick baking paper
- Medium and large mixing bowls
- Spatula or wooden spoon
- Microwave-safe bowl for melting chocolate
- Electric mixer (recommended but not essential)
Why This Formula Works Brilliantly
- Streamlined Ingredients: No hunting for obscure items—just everyday pantry staples plus Kinder chocolate.
- No Oven Required: Perfect for summer days when heating up the kitchen is the last thing you want.
- Kinder Flavor Throughout: Every component incorporates that distinctive chocolate profile.
- Make-Ahead Friendly: Ideal for preparing a day before gatherings or celebrations.
- Universal Appeal: Delights chocolate enthusiasts of all ages.
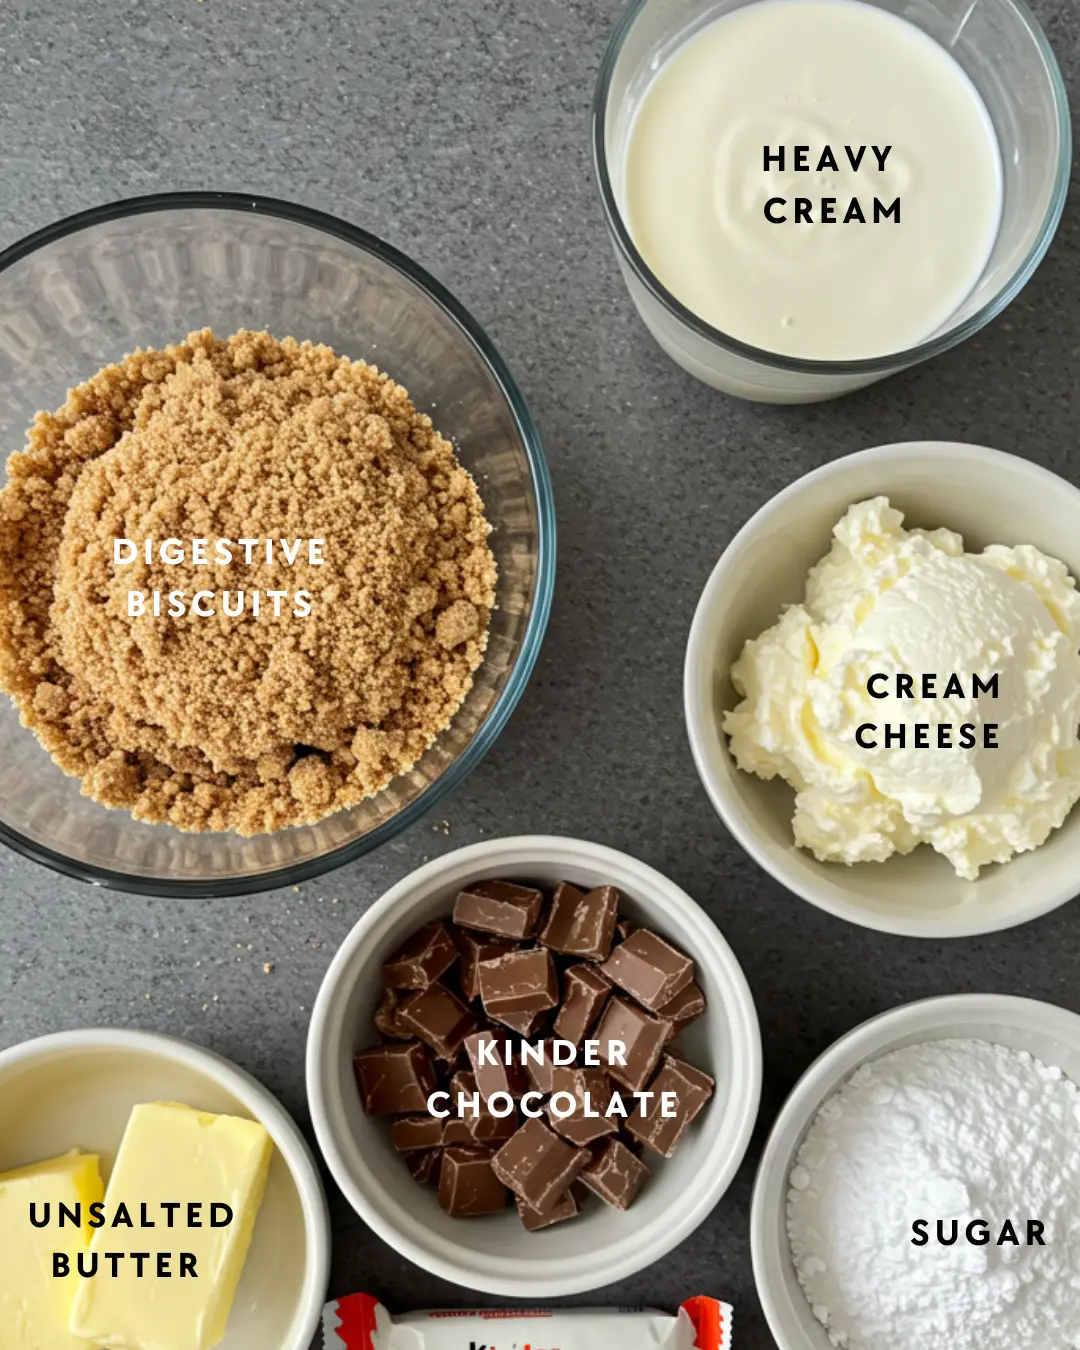
Ingredients for No-Bake Kinder Cheesecake Bars
Base Layer:
- 250g digestive biscuits, finely crushed (approximately 2½ cups)
- 100g unsalted butter, melted (7 tablespoons)
Creamy Filling:
- 500g full-fat cream cheese, at room temperature (17.5 ounces)
- 150g Kinder chocolate, melted and slightly cooled (5.3 ounces)
- 100g confectioners’ sugar, sifted (¾ cup)
Decadent Topping:
- 200g Kinder chocolate (7 ounces)
- 100ml heavy cream (⅓ cup plus 1 tablespoon)
- 9 Kinder Bueno chunks for decoration (optional but recommended)
Pan Size: 8×8-inch (20×20cm) square tin Setting Time: Minimum 3 hours, preferably overnight
Creating Your Kinder Cheesecake Bars
Step 1: Prepare the Biscuit Foundation
Begin by lining your square tin with non-stick baking paper, ensuring it extends slightly up the sides for easy removal later.
Transform the digestive biscuits into fine crumbs using a food processor. Alternatively, place them in a sealed plastic bag and crush with a rolling pin until you achieve a sandy texture.
In your mixing bowl, combine the biscuit crumbs with melted butter, stirring thoroughly until every crumb is moistened. The mixture should resemble wet sand and hold together when pressed.
Transfer this mixture to your prepared tin, pressing firmly and evenly across the bottom. I find using the flat bottom of a glass helps create a smooth, compact base. Refrigerate while preparing the next layer.
Step 2: Create the Kinder Cheesecake Layer
In your large mixing bowl, combine the room-temperature cream cheese and sifted confectioners’ sugar. This is where your electric mixer becomes valuable—beat until completely smooth and free of lumps.
Melt your Kinder chocolate using short bursts in the microwave, stirring frequently to prevent scorching. Allow it to cool slightly—it should be fluid but not hot to the touch. This cooling step is crucial; if the chocolate is too warm, it can cause your cream cheese mixture to seize.
Gradually fold the melted Kinder chocolate into your cream cheese mixture, combining thoroughly until you achieve a uniform light brown color throughout.
Step 3: Assemble the Cheesecake Layer
Remove your tin from the refrigerator and spoon the cheesecake filling over the chilled biscuit base.
Using your spatula or the back of a spoon, spread the mixture evenly, working from the center outward. Take care to create a level surface, particularly at the edges. Return to the refrigerator while preparing the final component.
Step 4: Craft the Kinder Ganache
For the crowning glory, place your Kinder chocolate pieces in a heat-safe bowl. Pour the heavy cream over the chocolate.
Heat this combination in the microwave using 30-second intervals at medium power (approximately 500W). The goal is to warm the cream sufficiently to melt the chocolate without boiling.
Once heated, let the mixture stand undisturbed for 2 minutes—this allows the warm cream to begin melting the chocolate naturally. Then, stir gently and slowly until completely smooth and glossy.
The key to perfect ganache is patience during stirring. Moving too vigorously incorporates air bubbles, which is particularly noticeable with Kinder chocolate. Gentle, deliberate stirring creates the smoothest result.
Allow your ganache to cool slightly while remaining pourable. It should be warm but not hot—we’re aiming to top our cheesecake layer without melting it.
Step 5: Final Assembly and Setting
Remove your cheesecake from the refrigerator and carefully pour the ganache over the filling layer. Using your spatula, guide it gently to cover the entire surface.
If using Kinder Bueno pieces, arrange them decoratively on top while the ganache remains soft. I typically create a 3×3 grid pattern, which makes portioning easier later.
Return your creation to the refrigerator and allow it to set completely—at least 3 hours, though overnight chilling yields the most satisfying texture and clean slices.
Tips for the Best Cheesecake Bars
- Temperature matters: Ensure your cream cheese is truly at room temperature for the smoothest filling.
- Cooling periods: Don’t rush the cooling of melted chocolate before incorporation.
- Quality ingredients: Use name-brand cream cheese (like Philadelphia) for reliable texture and setting.
- Clean slicing: Dip your knife in hot water and wipe clean between cuts for professional-looking portions.
- Patience pays: The longer these bars chill, the more developed their flavor becomes.
Creative Variations
- Alternative base: Try graham crackers, Biscoff cookies, or chocolate digestives for different foundation flavors.
- White chocolate twist: Substitute white chocolate for the Kinder in the ganache for a striking color contrast.
- Flavor enhancement: A pinch of sea salt in the ganache balances the sweetness beautifully.
- Textural contrast: Fold chopped hazelnuts into the filling for added crunch and complementary flavor.
Serving Suggestions
These No-Bake Kinder Cheesecake Bars are stunning on their own, but can be elevated further:
- Add a swirl of lightly whipped cream alongside each portion
- Scatter fresh berries for color contrast and flavor balance
- Dust with a light coating of cocoa powder for visual appeal
- For special occasions, add gold sprinkles or edible glitter
Storage Recommendations
Keep these bars refrigerated in an airtight container for optimal freshness. They’ll maintain perfect texture for up to 4 days, though they rarely last that long!
These bars don’t freeze well due to texture changes in the ganache layer, so I recommend enjoying them fresh.
Create these No-Bake Kinder Cheesecake Bars for your next gathering and watch them disappear before your eyes! The combination of familiar Kinder chocolate flavor in an elegant, no-bake format makes them irresistible to chocolate lovers of all ages.
Print
No-Bake Kinder Cheesecake Bars
Description
Irresistibly creamy No-Bake Kinder Cheesecake Bars featuring three perfectly harmonized layers: a buttery digestive biscuit base, velvety Kinder chocolate-infused cheesecake filling, and glossy Kinder chocolate ganache topping. These decadent bars capture the nostalgic flavor of Kinder chocolate in a sophisticated no-bake dessert that’s surprisingly simple to create.
Ingredients
For the Biscuit Base:
- 250g digestive biscuits, finely crushed (2½ cups)
- 100g unsalted butter, melted (7 tablespoons)
For the Cheesecake Filling:
- 500g full-fat cream cheese, at room temperature (17.5 ounces)
- 150g Kinder chocolate, chopped (5.3 ounces)
- 100g confectioners’ sugar, sifted (¾ cup)
For the Ganache Topping:
- 200g Kinder chocolate, chopped (7 ounces)
- 100ml heavy cream (⅓ cup plus 1 tablespoon)
- 9 Kinder Bueno chunks, for decoration (optional)
Special Equipment
- 8×8-inch (20×20cm) square baking tin
- Non-stick baking paper
- Electric mixer (recommended)
- Food processor (optional, for crushing biscuits)
Instructions
Prepare the Biscuit Base:
- Line your square baking tin with non-stick baking paper, leaving some overhang on the sides for easy removal later.
- Crush digestive biscuits into fine crumbs using a food processor or by placing them in a sealed plastic bag and crushing with a rolling pin.
- In a medium bowl, thoroughly combine the biscuit crumbs with melted butter until every crumb is moistened. The texture should resemble wet sand that holds together when pressed.
- Transfer the mixture to your prepared tin and press firmly to create an even, compact base. (Using the flat bottom of a glass helps achieve a smooth surface.)
- Refrigerate while preparing the filling.
Create the Cheesecake Filling:
- In a large mixing bowl, beat room-temperature cream cheese and sifted confectioners’ sugar until completely smooth and free of lumps. An electric mixer produces the best results here.
- Melt the Kinder chocolate in a microwave-safe bowl using 20-second intervals, stirring between each, until just melted and smooth. Allow to cool slightly – it should remain fluid but not be hot to the touch.
- Gradually fold the melted Kinder chocolate into the cream cheese mixture, combining thoroughly until you achieve a uniform light brown color with no streaks.
Assemble the Cheesecake Layer:
- Remove the tin from the refrigerator and evenly spread the cheesecake filling over the chilled biscuit base.
- Use a spatula to smooth the surface, working from the center outward and paying special attention to creating a level surface at the edges.
- Return to the refrigerator while preparing the ganache.
Craft the Kinder Ganache:
- Place the chopped Kinder chocolate in a heat-safe bowl.
- Pour the heavy cream over the chocolate.
- Heat in the microwave using 30-second intervals at medium power (approximately 500W) until the cream is hot but not boiling and the chocolate has begun to melt.
- Allow the mixture to sit undisturbed for 2 minutes before stirring.
- Stir slowly and gently (important for avoiding air bubbles) until completely smooth and glossy.
- Allow the ganache to cool slightly while remaining pourable – it should be warm but not hot enough to melt the cheesecake layer.
Final Assembly and Setting:
- Remove the cheesecake from the refrigerator and carefully pour the ganache over the filling layer.
- Use a spatula to guide the ganache to cover the entire surface.
- If using Kinder Bueno pieces, arrange them in a decorative pattern on top while the ganache is still soft. (A 3×3 grid works well for 9 equal portions.)
- Refrigerate for a minimum of 3 hours, though overnight chilling (8-12 hours) produces the best texture and flavor development.
Serving:
- When ready to serve, lift the cheesecake from the tin using the overhanging parchment paper.
- For clean slices, dip a sharp knife in hot water, wipe dry, and slice. Clean the knife between cuts.
- For 16 squares, cut into a 4×4 grid. For larger portions, cut into a 3×3 grid.
Notes
- Temperature matters: Ensure your cream cheese is truly at room temperature (at least 30 minutes out of the refrigerator) to prevent lumps in the filling.
- Patience with chocolate: When melting Kinder chocolate, use lower power settings and stir frequently to prevent scorching.
- Quality ingredients: Philadelphia or another high-quality cream cheese brand provides the most reliable setting properties.
- Gentle ganache stirring: Kinder chocolate ganache is particularly prone to air bubbles; stir slowly in one direction for the glossiest finish.
- Overnight chilling: While 3 hours is the minimum setting time, overnight refrigeration allows flavors to fully develop and ensures clean slicing.
Prep Time: 30 minutes | Chill Time: Minimum 3 hours (preferably overnight) | Yields: 16 squares